设计换肤方案
android 换肤(1)——插件式无缝换肤(解析鸿洋大神的换肤流程)
android 换肤(2)——插件式无缝换肤(解析鸿洋大神的换肤流程)
换肤介绍
App换肤主要涉及的有页面中文字的颜色、控件的背景颜色、一些图片资源和主题颜色等资源。
为了实现换肤资源不与原项目混淆,尽量降低风险,可以将这些资源封装在一个独立的Apk资源文件中。在App运行时,主程序动态的从Apk皮肤包中读取相应的资源,无需Acitvity重启即可实现皮肤的实时更换,皮肤包与原安装包相分离,从而实现插件式换肤。
换肤原理
1. 如何加载皮肤资源文件
使用插件式换肤,皮肤资源肯定不会在被封装到主工程中,要怎么加载外部的皮肤资源呢?
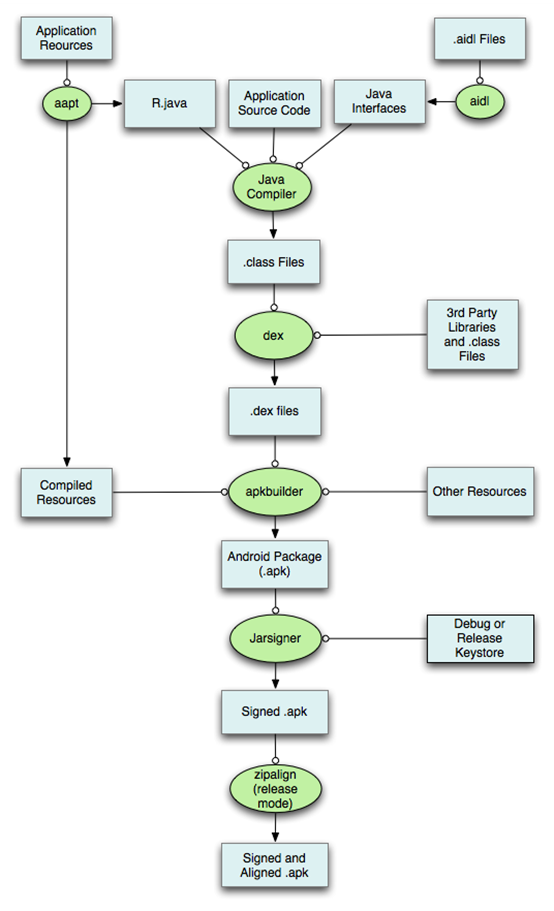
先看下 Apk 的打包流程

这里流程中,有两个关键点
- 1.R文件的生成
R文件是一个Java文件,通过R文件我们就可以找到对应的资源。R文件就像一张映射表,帮助我们找到资源文件。
- 2.资源文件的打包生成
资源文件经过压缩打包,生成 resources 文件,通过R文件找到里面保存的对映的资源文件。在 App 内部,我们一般通过下面代码,获取资源:
context.getResource.getString(R.string.hello);
context.getResource.getColor(R.color.black);
context.getResource.getDrawable(R.drawable.splash);
这个时获取 App 内部的资源,能我们家在皮肤资源什么思路吗?加载外部资源的 Resources 能通过类似的思路吗? 我们查看下 Resources 类的源码,发现 Resources 的构造函数
public Resources(AssetManager assets, DisplayMetrics metrics, Configuration config) {
      this(assets, metrics, config, CompatibilityInfo.DEFAULT_COMPATIBILITY_INFO);
  }
这里关键是第一个参数如何获取,第二和第三个参数可以通过 Activity 获取到。我们再去看下 AssetManager 的代码,同时会发现下面的这个
/**
     * Add an additional set of assets to the asset manager.  This can be
     * either a directory or ZIP file.  Not for use by applications.  Returns
     * the cookie of the added asset, or 0 on failure.
     * {@hide}
     */
  public final int addAssetPath(String path) {
        synchronized (this) {
            int res = addAssetPathNative(path);
            makeStringBlocks(mStringBlocks);
            return res;
        }
    }
AssetManager 可以加载一个zip 格式的压缩包,而 Apk 文件不就是一个 压缩包吗。我们通过反射的方法,拿到 AssetManager,加载 Apk 内部的资源,获取到 Resources 对象,这样再想办法,把 R文件里面保存的ID获取到,这样既可以拿到对应的资源文件了。理论上我们的思路时成立的。 我们看下,如何通过代码获取 Resources 对象。
AssetManager assetManager = AssetManager.class.newInstance();
Method addAssetPath = assetManager.getClass().getMethod("addAssetPath", String.class);
addAssetPath.invoke(assetManager, skinPkgPath);

Resources superRes = context.getResources();
Resources skinResource = new Resources(assetManager,superRes.getDisplayMetrics(),superRes.getConfiguration());
2.如何标记需要换肤的View
找到资源文件之后,我们要接着标记需要换肤的 View 。
找到需要换肤的 View 怎么寻找哪些是我们要关注的 View 呢? 我们还是重 View 的创建时机寻找机会。我们添加一个布局文件时,会使用 LayoutInflater的 Inflater方法,我们看下这个方法是怎么讲一个View添加到Activity 中的。 LayoutInflater 中有个接口
public interface Factory {
        /**
         * Hook you can supply that is called when inflating from a LayoutInflater.
         * You can use this to customize the tag names available in your XML
         * layout files.
         *
         * <p>
         * Note that it is good practice to prefix these custom names with your
         * package (i.e., com.coolcompany.apps) to avoid conflicts with system
         * names.
         *
         * @param name Tag name to be inflated.
         * @param context The context the view is being created in.
         * @param attrs Inflation attributes as specified in XML file.
         *
         * @return View Newly created view. Return null for the default
         *         behavior.
         */
        public View onCreateView(String name, Context context, AttributeSet attrs);
    }
根据这里的注释描述,我们可以自己实现这个接口,在 onCreateView 方法中选择我们需要标记的View,根据 AttributeSet 值,过滤不需要关注的View。
标记 View 与对应的资源
我们在 View 创建时,通过过滤 Attribute 属性,找到我们要标记的 View ,下面我们就把这些View的属性记下来
for (int i = 0; i < attrs.getAttributeCount(); i++){
            String attrName = attrs.getAttributeName(i);
            String attrValue = attrs.getAttributeValue(i);
            if(!AttrFactory.isSupportedAttr(attrName)){
                continue;
            }
            if(attrValue.startsWith("@")){
                try {
                    int id = Integer.parseInt(attrValue.substring(1));
                    String entryName = context.getResources().getResourceEntryName(id);
                    String typeName = context.getResources().getResourceTypeName(id);
                    SkinAttr mSkinAttr = AttrFactory.get(attrName, id, entryName, typeName);
                    if (mSkinAttr != null) {
                        viewAttrs.add(mSkinAttr);
                    }
                } catch (NumberFormatException e) {
                    e.printStackTrace();
                } catch (NotFoundException e) {
                    e.printStackTrace();
                }
            }
        }
然后把这些 View 和属性值,一起封装保存起来
if(!ListUtils.isEmpty(viewAttrs)){
            SkinItem skinItem = new SkinItem();
            skinItem.view = view;
            skinItem.attrs = viewAttrs;
            mSkinItems.add(skinItem);
            if(SkinManager.getInstance().isExternalSkin()){
                skinItem.apply();
            }
    }
3.如何做到及时更新UI
由于我们把需要更新的View 以及属性值都保存起来了,更新的时候只要把他们取出来遍历一遍即可。
@Override
    public void onThemeUpdate() {
        if(!isResponseOnSkinChanging){
            return;
        }
        mSkinInflaterFactory.applySkin();
    }
//applySkin 的具体实现
public void applySkin(){
        if(ListUtils.isEmpty(mSkinItems)){
            return;
        }
        for(SkinItem si : mSkinItems){
            if(si.view == null){
                continue;
            }
            si.apply();
        }
    }
4.如何制作皮肤包
皮肤包制作相对简单
-
1.创建独立工程 model,包名任意。
-
2.添加资源文件到 model 中,不需要 java 代码
-
3.运行 build.gradle 脚本,打包命令,生成apk文件,修改名称为 xxx.skin 皮肤包即可。